
This Image is your Map to the various worlds you will travel to.
Click any of the Worlds to jump to that portion of the Solve.
 CDROM #1 - PRISON WORLD
GETTING OUT OF THE CELL
Talk to the prisoner
CDROM #1 - PRISON WORLD
GETTING OUT OF THE CELL
Talk to the prisoner  .
Get the key.
Use the key on prisoner - it will break.
Show it to him until he says something about "screwdriver".
Get the dirty sheet off the bunk.
Look at the square hole in the center of the grate flooring.
There is an object beneath the grate but you cannot reach it.
Stuff the sheet in toilet and flush to flood the room.
Look at square hole in floor twice to get mirror piece which
has now floated into grabbing distance.
Go to door on left then zoom in on plate next to door.
Use broken card (remember the screwdriver comment) to remove
all the screws and reveal the back of a touchpad.
.
Get the key.
Use the key on prisoner - it will break.
Show it to him until he says something about "screwdriver".
Get the dirty sheet off the bunk.
Look at the square hole in the center of the grate flooring.
There is an object beneath the grate but you cannot reach it.
Stuff the sheet in toilet and flush to flood the room.
Look at square hole in floor twice to get mirror piece which
has now floated into grabbing distance.
Go to door on left then zoom in on plate next to door.
Use broken card (remember the screwdriver comment) to remove
all the screws and reveal the back of a touchpad.
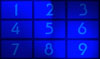 There is a 9 button touchpad.
The code is
6-2-7-5-1-9-3-8-4
The door opens revealing some lasers. Use the mirror to free the
guy nextdoor and eventually escape your cell. You will be captured
and taken off to be tortured by the warden.
TORTURE
Talk your way off of the rack
There is a 9 button touchpad.
The code is
6-2-7-5-1-9-3-8-4
The door opens revealing some lasers. Use the mirror to free the
guy nextdoor and eventually escape your cell. You will be captured
and taken off to be tortured by the warden.
TORTURE
Talk your way off of the rack  then
then  .
Grab the gun as it flies off the robot and kill the warden.
Get the gun and keys from what's left of the warden.
Get the battery from your dying friend.
Head down the hall shooting all robots. Aim for the yellow flashes.
Enter the Pod Room and click on the Pod Shield Control to Zoom In.
Put the broken keycard in the right slot. It gets stuck.
Click the keyring on the mirror then keep clicking the keys until you
find the matching keycard for the left slot.
Now click the gun on the mirror and rotate until you see the slot in
the handle. Insert the battery.
Now zap the broken card with the gun to open the panel.
Talk to Pod Dude . Once he is free you will get the Green
Crystal and return to the Midworld Temple.
INDULGENCES - CDROM #2
GARDEN and CLIFFS
Talk to the plants
.
Grab the gun as it flies off the robot and kill the warden.
Get the gun and keys from what's left of the warden.
Get the battery from your dying friend.
Head down the hall shooting all robots. Aim for the yellow flashes.
Enter the Pod Room and click on the Pod Shield Control to Zoom In.
Put the broken keycard in the right slot. It gets stuck.
Click the keyring on the mirror then keep clicking the keys until you
find the matching keycard for the left slot.
Now click the gun on the mirror and rotate until you see the slot in
the handle. Insert the battery.
Now zap the broken card with the gun to open the panel.
Talk to Pod Dude . Once he is free you will get the Green
Crystal and return to the Midworld Temple.
INDULGENCES - CDROM #2
GARDEN and CLIFFS
Talk to the plants  to prove you are worthy to pass.
To get past the door you need to pull the rings to make the animals
say "eeni-meeni-minie-mo". If you number the rings left to right and
top to bottom the sequence should be: 2-7-4-7-6-7-5
Sit down at the table with the food and add the glass and napkin to
your inventory. Read the poem where the napkin used to be.
Examine the napkin in the mirror and read the poem to find out what
order to eat the foods. You will need to read the napkin between each
food to learn which one is next. The order is Chicken, Orange Pepper,
Carrot, Donut, and Cake. You can miss 2 times before you die. It's
worth it to miss once just to see Riana blow chunks.
FOUNTAIN and the GATE
Click on the statue and look in the water but DON'T DRINK!
Click your glass on the statue to transform him into "Buns of Granite".
Now look in the water to find a piece of an upcoming puzzle.
Head to the gate and solve the snake puzzle to open it. You must match
the rest of the snake to the color of your piece. The colors change each
time you move a piece. The trick is not to move the pieces more than 2
spaces. Start with the neck and move each piece one slot as you spiral
into the center. When you reach the last piece start moving it back and
forth until it is in its final position and the proper color. Repeat for each
of the other pieces as you spiral back out to the neck. Complete the
puzzle with the final piece from your inventory.
FLOWERS
Click on the flowers to smell them in this order:
Sniff Blue-Red-Yellow to make green sprouts appear in the bushes.
Sniff Red-Blue to turn those sprouts purple.
Sniff Yellow-Red to turn top flower purple and open a path through the plants.
Enter the big flower and talk to the "Geni of the Lava Lamp" .
After a brief sexual encounter you will capture the Geni in his bottle and
add it/him to your inventory.
ROMAN COLUMNS
Proceed up the stairs to meet Javelin; the redhead in the toga. Talk to her
or to start the action. When she shows her true self, quickly
use the Lava Lamp and let the Geni do the fighting. When the battle is
over you will have the Blue Crystal and return to the Midworld Temple.
NATIVE - CDROM #3
CIRCLE OF DESTINY
Talk to the Medicine Man and get the gourd.
Enter the hut on the left and find the "kinda broken" dish.
Touch the egg and make a note of the shape of the "Big Knife".
Not much left to do here right now, so exit the village to get the Island Map.
Head to the beach and check it out. As you are leaving grab the Palm Frond
from the woods on the right.
Return to the village and find the pile of gross objects. Start moving
them to the side until you find a stone disc covered with maggots.
Use the Palm Frond to sweep away the maggots and take the disc.
Examine the disc in your inventory and spin it until you can see and take
the Green Slime. Now examine the cracked bowl in your inventory and patch
it with the slime. Return to the beach and fill the bowl with water.
Head to the interior of the island and go to the Purple Mushrooms.
Water the thirsty plants with the water in the bowl.
When the bees arrive use the gourd to capture each of the bees.
Return to the beach and refill the bowl with water then go to the volcano.
Use the disc on the lava then pour the water into the circle to create
the Circle of Destiny. Take the disc back to the Medicine Man and get your
next assignment.
JUICE OF THE LUMBA FRUIT
Get a closeup view of the green dude lying on the ground near the right
hut. Locate and take the orange and red fruits which haven't been bitten
into yet. Now go look at the other guy and get the uneaten blue fruit.
Take the fruit into the hut on the right.
Click one of the fruits on the jar in the wood basket and Riana will
squeeze all three and take the jar. Take the juice back to the Medicine Man
to complete your ritual test. Finally, pick the knife which matches the one
you saw when you touched the egg earlier.
ENTERING THE DOME
Enjoy the campfire and the ritual and end it by talking to the green guy
to prove you are worthy to pass.
To get past the door you need to pull the rings to make the animals
say "eeni-meeni-minie-mo". If you number the rings left to right and
top to bottom the sequence should be: 2-7-4-7-6-7-5
Sit down at the table with the food and add the glass and napkin to
your inventory. Read the poem where the napkin used to be.
Examine the napkin in the mirror and read the poem to find out what
order to eat the foods. You will need to read the napkin between each
food to learn which one is next. The order is Chicken, Orange Pepper,
Carrot, Donut, and Cake. You can miss 2 times before you die. It's
worth it to miss once just to see Riana blow chunks.
FOUNTAIN and the GATE
Click on the statue and look in the water but DON'T DRINK!
Click your glass on the statue to transform him into "Buns of Granite".
Now look in the water to find a piece of an upcoming puzzle.
Head to the gate and solve the snake puzzle to open it. You must match
the rest of the snake to the color of your piece. The colors change each
time you move a piece. The trick is not to move the pieces more than 2
spaces. Start with the neck and move each piece one slot as you spiral
into the center. When you reach the last piece start moving it back and
forth until it is in its final position and the proper color. Repeat for each
of the other pieces as you spiral back out to the neck. Complete the
puzzle with the final piece from your inventory.
FLOWERS
Click on the flowers to smell them in this order:
Sniff Blue-Red-Yellow to make green sprouts appear in the bushes.
Sniff Red-Blue to turn those sprouts purple.
Sniff Yellow-Red to turn top flower purple and open a path through the plants.
Enter the big flower and talk to the "Geni of the Lava Lamp" .
After a brief sexual encounter you will capture the Geni in his bottle and
add it/him to your inventory.
ROMAN COLUMNS
Proceed up the stairs to meet Javelin; the redhead in the toga. Talk to her
or to start the action. When she shows her true self, quickly
use the Lava Lamp and let the Geni do the fighting. When the battle is
over you will have the Blue Crystal and return to the Midworld Temple.
NATIVE - CDROM #3
CIRCLE OF DESTINY
Talk to the Medicine Man and get the gourd.
Enter the hut on the left and find the "kinda broken" dish.
Touch the egg and make a note of the shape of the "Big Knife".
Not much left to do here right now, so exit the village to get the Island Map.
Head to the beach and check it out. As you are leaving grab the Palm Frond
from the woods on the right.
Return to the village and find the pile of gross objects. Start moving
them to the side until you find a stone disc covered with maggots.
Use the Palm Frond to sweep away the maggots and take the disc.
Examine the disc in your inventory and spin it until you can see and take
the Green Slime. Now examine the cracked bowl in your inventory and patch
it with the slime. Return to the beach and fill the bowl with water.
Head to the interior of the island and go to the Purple Mushrooms.
Water the thirsty plants with the water in the bowl.
When the bees arrive use the gourd to capture each of the bees.
Return to the beach and refill the bowl with water then go to the volcano.
Use the disc on the lava then pour the water into the circle to create
the Circle of Destiny. Take the disc back to the Medicine Man and get your
next assignment.
JUICE OF THE LUMBA FRUIT
Get a closeup view of the green dude lying on the ground near the right
hut. Locate and take the orange and red fruits which haven't been bitten
into yet. Now go look at the other guy and get the uneaten blue fruit.
Take the fruit into the hut on the right.
Click one of the fruits on the jar in the wood basket and Riana will
squeeze all three and take the jar. Take the juice back to the Medicine Man
to complete your ritual test. Finally, pick the knife which matches the one
you saw when you touched the egg earlier.
ENTERING THE DOME
Enjoy the campfire and the ritual and end it by talking to the green guy  before slicing him in half. Take the seed and plant it on the small
mound between the flowers you watered earlier.
Watch the tree grow and take the fallen fruit.
Now head to the Purple Dome structure and eat the fruit. You will get
zapped into the dome.
Once inside you need to talk to the Orb . Your flawless logic
will cause the Orb to overload and destruct thus freeing the frozen females
and return you to Midworld with the Red Crystal.
THE CASTLE
Click on the central piece with the 3 crystals to be transported to the
castle. You will meet the Evil Stranger and eliminate him long enough to
have a brief encounter with Javelin.
Head down the corridor and take the door on the right where you will meet
up with the Evil Stranger.
Talk to him to buy yourself some more time.
At the next set of doors head into the left door to meet the biker. Talk
to him to continue to the next set of doors.
Now go in (you guessed it) the middle door to meet Prince Charming. Talk
to him and continue your journey to the top of the castle.
Use your Crystals on the Orb to continue up to the tower. Kill the first
incarnation of the Evil Stranger then talk to the hunchback with the bad
case of acne . Pushing him out the window is your last official act.
The castle will blow up and you will be transported back to the "real world"
where you hop on your Harley and ride off to get ready for the sequel...
before slicing him in half. Take the seed and plant it on the small
mound between the flowers you watered earlier.
Watch the tree grow and take the fallen fruit.
Now head to the Purple Dome structure and eat the fruit. You will get
zapped into the dome.
Once inside you need to talk to the Orb . Your flawless logic
will cause the Orb to overload and destruct thus freeing the frozen females
and return you to Midworld with the Red Crystal.
THE CASTLE
Click on the central piece with the 3 crystals to be transported to the
castle. You will meet the Evil Stranger and eliminate him long enough to
have a brief encounter with Javelin.
Head down the corridor and take the door on the right where you will meet
up with the Evil Stranger.
Talk to him to buy yourself some more time.
At the next set of doors head into the left door to meet the biker. Talk
to him to continue to the next set of doors.
Now go in (you guessed it) the middle door to meet Prince Charming. Talk
to him and continue your journey to the top of the castle.
Use your Crystals on the Orb to continue up to the tower. Kill the first
incarnation of the Evil Stranger then talk to the hunchback with the bad
case of acne . Pushing him out the window is your last official act.
The castle will blow up and you will be transported back to the "real world"
where you hop on your Harley and ride off to get ready for the sequel...
 THANKS FOR PLAYING
Look for Riana Rouge II Coming Soon
Riana Rouge - Guide to Midworld (c) 1998 Mark Smith
All other names, images and materials copyrighted
by Black Dragon Productions.
Special Thanks to Gillian Bonner
for my autographed copy of the game.
For other great Walkthroughs, check out GAME CHRONICLES
THANKS FOR PLAYING
Look for Riana Rouge II Coming Soon
Riana Rouge - Guide to Midworld (c) 1998 Mark Smith
All other names, images and materials copyrighted
by Black Dragon Productions.
Special Thanks to Gillian Bonner
for my autographed copy of the game.
For other great Walkthroughs, check out GAME CHRONICLES


The mirror is an important part of this game. It allows you to examine items in your inventory. You can often find small details about an object when you rotate it in 3D. You can also combine items in the mirror with another item from your inventory. This is crucial to the completion of the adventure.
Conversation is an important part of Riana's adventure. She will often have to talk to the people she meets and what she says can directly affect her future. The various colors of the Emotivator represent various emotional responses. Sometimes you can choose multiple responses; other times there is only one correct response. Death is almost always the result of an incorrect response so I would recommend saving your game before each encounter. Of course I will provide you with the correct response(s) in the text below. So let's proceed with the game... After the opening movie Riana finds herself transported to another dimension, alone and in the Temple of Midworld. Before her rests the Worldmaker, but it is missing the 3 Crystals which allow it to work. Riana must travel into each of the 3 Worlds and locate the Crystal from that world to repair the Worldmaker, rescue Javelin and defeat the Evil Stranger.